
There was a company initiative to collect, track, and calculate the latest buzz going through product development and marketing.
Net promoter score (NPS).
I have nothing against NPS or implementing new processes. Actually, I like it and try to seek new processes out. It helps improve, grow, and ultimately make more money. What I try to avoid is adding more tools and complexity to your marketing stack.
I would much prefer being able to do things with the existing stack, if at all possible. Reason being that the tools in the existing stack already communicate well with each other. Everyone in the team is already trained on the existing tools. And there is less risk for issues.
That’s why when I had to implement an NPS system, I created one out of our current marketing stack. I tried to bring in a specific NPS tool, but none seemed to fit our needs perfectly. So, I took what some of the NPS tools were doing and built it with our existing marketing stack.
Below, I will lay out the process I used that will allow you to do the same thing. I will provide you with two setup options. A basic, and a bit more advanced. Hopefully, then, you are going to build your own NPS system with no additional tools. So, let’s build our NPS system.
- What is NPS?
- What are we building?
- How to Build an NPS System
- Tools you will need
- The Basic NPS System
- The Advanced NPS System
- How to Calculate NPS
What is Net Promotor Score – NPS?
NPS is your net promotor score. It is a measurement score that is used to track the satisfaction of your customers. It can range from -100 to 100. It is calculated by surveying customers, then using a formula that subtracts those who are not pleased with your product from those who are.
To get your NPS you need to take what are called “Promotors” and subtract them, from what are called, “Detractors”. The way you get your promotors and detractors is by asking how a customer would rate their experience with you on a scale of 1-10. Based on those responses, you get your categories.
You can download our excel template to help you calculate this.
Your promotors are defined as any respondents who respond with a 9 or a 10 response. Then you have what are called passives, which is anyone that responds with a 7 or an 8. Lastly, you have your detractors, which is anyone that responds with a 6 or below.
You take all that and find the percentage of your promotors and subtract them from your detractors. The percentages are what you are subtracting. Now you have your NPS.
That is what an NPS is and how you calculate it. But, the point here is building a system to capture your NPS with no additional tools or programs.
To do that, I am going to take you through the setup of your system, start to finish, and then get you to calculate your NPS. Follow the steps below and you will have a way to track, calculate, and use your NPS to improve customer satisfaction.
What are we building?
For a user, all this should merely take the click of a response. Easy and no more than 15 seconds. That way, they can get about their day.
Here is what this would look like:
How to Build an NPS Collection System
There are two setups I will walk you through. The first is the bare bones setup. All you really need are the basic tools every marketer who runs a website should be using.
The second is the more advanced system. This is the preferred setup. It will allow you to track your NPS score like quite a few of the software options out there do. If you are a more advanced marketer, you will still be able to use your current tools. You just happen to have a more developed marketing stack to start with.
With that, let’s jump into building a system to track NPS.
The Tools You Need
In the basic setup, there are a few tools you’ll need. Things like a content management system (CMS) to build landing pages and Google Analytics. These are things you probably already have in place.
Below are the necessary tools and what you will do with them.
Landing Page Builder
The first tool is a landing page builder. If you’re on WordPress, you can just create a page there. But depending on your CMS, you may need, or have, a specific landing page builder.
You just need the ability to create dedicated thank you pages.
Web Form Builder (Optional)
If you already have a web form program, whether one of WordPress’s plugins, or part of a marketing automation software, it might be good to use this. This will allow you to capture responses for negative, or positive, NPS scores.
If you don’t already have one, and you’re using WordPress, I would just get the WP Form Builder. It will be the easiest to get started with quickly.
This part is optional, so no need to stress too much if you do not already have it in place.
UTM Code Builder
The next tool you need is the ability to create UTM codes. There are plenty of programs out there to allow you to do this. You just need to have access to one. It is how we are going to track different responses.
Some recommendations are:
Google Analytics
You need Google Analytics. This is where you are going to segment your traffic to the various responses. Just make sure it is setup and you are familiar with using it.
Pop-up Software
The next tool you need is a pop-up, or overlay, tool. These typically have free versions, and you can get quite sophisticated with them. Privy is a good option for your website. AppCues is a good option for in your application. You could also use proactive chat, like Intercom.
The point here is that you need a tool that prompts your visitors with how they feel about your product or service. It is going to be your survey delivery method.
Now, you could use email for this, but seeing as we are looking at communication to customers, it might be better to communicate with them while they are engaging with your company, product, or application.
Spreadsheets
The last thing you need is spreadsheets. This is where you will export all your data for analysis.
Additional tools for the advanced setup
If you are planning on skipping to the advanced setup, these are the additional tools you will need.
Marketing Automation
A marketing automation system. Something where you can create events, track those events to contacts, then send emails and enroll in specific campaigns based on the NPS score.
Customer Relationship Management (CRM) Software
A customer relationship management (CRM) tool. This will allow you to segment your customers to create specific campaigns. The more targeted your campaigns the better your response rates.
Also, your CRM needs to allow you to create custom contact properties. The contact properties will be used for the score, the date the score is recorded, and the response of the customer if they provide a low score. All this needs to be recorded on the contact or company level. Depending on how you work with your database.
Data Analyst
The last part is having a data analyst on your team. This is someone who will manage the data, calculate the score, and analyze the responses over time. You may want to get as detailed as figuring out what customers are prone to producing what score. Seeing if there are trends. Then, act.
An analyst is a good asset to have for this project.
So, we have our tools. Now, let’s start with setting up our basic NPS tracking system.
The Basic NPS System
Setting up an NPS tracking system is actually quite a bit easier than you might think. It is only a few steps.
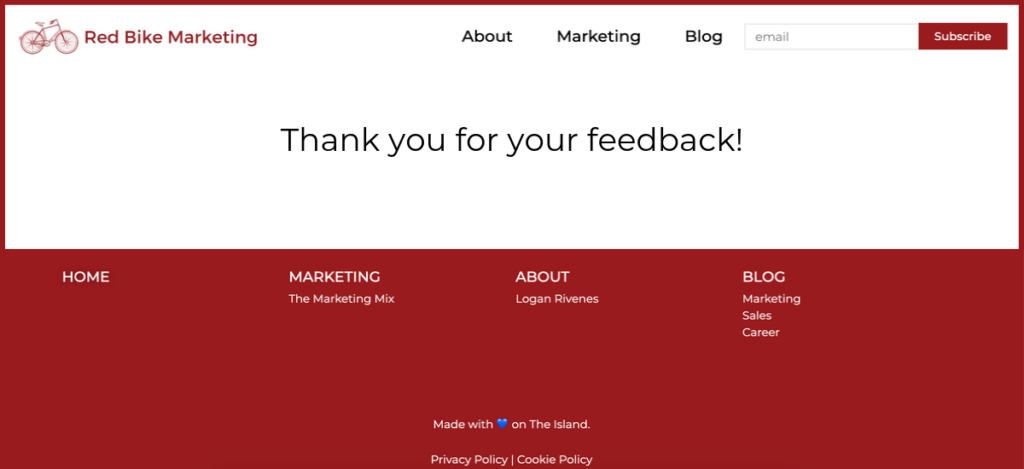
Step 1: Create a thank you page
First things first, create a thank you page that all respondents will go to. You need to create at least 1. Do not create an individual page for each response, as this is just a bit of unnecessary work.
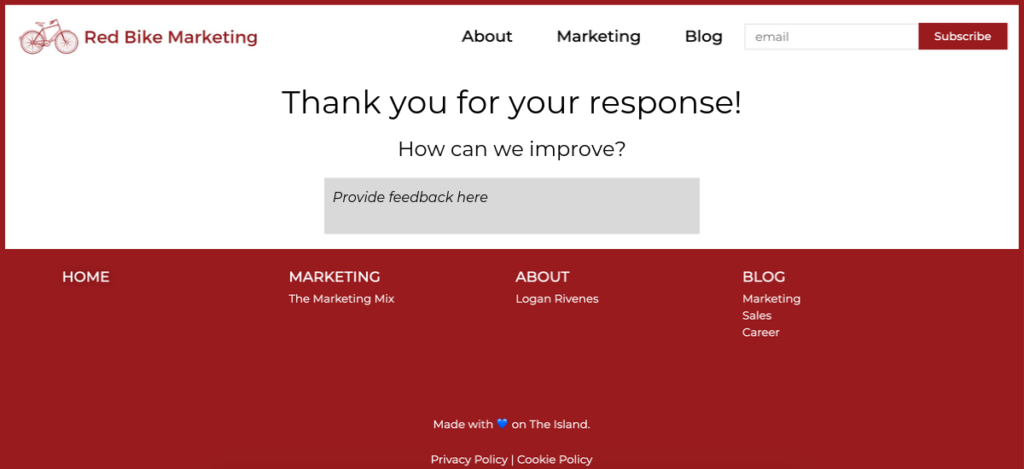
At maximum, create two pages. One page for your highest responders, either a five response or a 10, depending on how many responses you offer. And a second one for everyone else. Reason being, you may want to put a form with questions on the low responders. Which is why you need a form builder.

[Optional] Step 2: Create forms for responses
If you want to gather responses for your low NPS score respondents, then let’s set that system up now. If you choose to do a simple NPS system and use scoring of 1-5, then you will create two thank you pages. One Thank You page for everyone that responds with a 5. This will be a page with no form.
Then, the second page will be for those who respond with a 1-4 response. The idea is you will ask them if there are any ways to improve. I would suggest leaving this as an open question, where respondents can leave any answer.
Now, if you opt for 1-10 scoring, you will apply the same logic as above. But, page one will be for respondents who respond with a 9 or a 10. The second page will be all responses 1-8.
If you want to add a little extra insight into the basic setup, this is an easy way to do it.

Step 3: Create UTM Codes
The next step is creating your UTM codes. I suggest using all 3 parameters for the codes.
- Campaign
- Source
- Medium
The campaign is going to be the name of this particular NPS campaign. You may want to do multiple campaigns, so you want options to scale this. The next is source, which you can simply use “NPS Survey”. The last item is Medium, which will be the actual score.
An example UTM code, which you can use as a template, is the following:
- Campaign: Customer NPS
- Source: App NPS Survey
- Medium: 5

?utm_campaign=customer-nps&utm_source=app-nps-survey&utm_medium=5This is very similar to the UTM codes I use.
Step 4: Create a Pop-Up
The next step is to create the pop-up which will allow you to deliver the survey. Again, I am recommending that you provide this survey in your application, or on your website for customers.
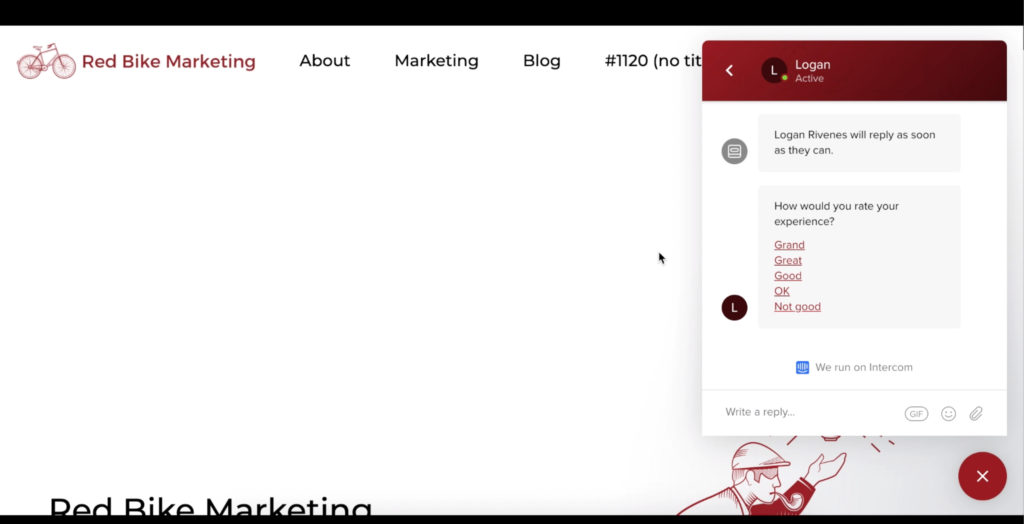
In the pop-up, you will need to decide how you would like to deliver the message. Whether as an overlay or a slide-in. Then, you need to determine your question, which will be something like the following:
How would you rate your experience with us?
Then, you have two options for responses. You can simply provide numbers, like 1-5 or 1-10.
Or, you can provide statements for the responses. Like the following:
- Grand
- Great
- Good
- OK
- Not Good
Whichever method you choose, the UTM codes that you created will be links embedded in the text. So, make sure the pop-up program you choose has this functionality.

Step 5: Launch your Campaign
Once your UTM codes are setup, your pop-ups are in place, and all your links are in your text, you are ready to launch your campaign. So, click the launch button and wait for the responses to pour in.
The length of time you need to wait before analysis will depend on your traffic and number of customers.
Which, will bring us to the last step, analysis.
Step 6: Calculate your NPS Score
The last step is analysis. To analyze these results, just pull the traffic in Google Analytics from your UTM codes. You can even date them when you export the information from Google Analytics.
Then, tally up the number of responses and calculate your NPS. To do that, you will go through the following formula:

You can download our excel template to help you calculate this.
To better understand calculating your NPS score, you can head to calculating your NPS score here.
That’s it. You have created a simple, automated NPS system. You can let this run as a campaign, then replicate for future campaigns. Either to the same audience, to see how they respond over time, or as different campaigns for different segments. You can really go crazy.
But, if you think you want a more robust NPS system, which applies an NPS score to specific customers, that is what we will go over below.
The Advanced NPS System
Taking the concepts from the above setup one step further, we will build a bit more detailed NPS system.
Step 1: Setup your Thank You Page
Just like in the basic setup, you’ll need to setup two Thank You pages.
The first page is for all your high score respondents. If you are using a 1-5 scoring scale, this first page will be for your 5 respondents. Or, if you are using a 1-10 scoring scale, this will be for your 9 and 10 respondents.
This first page is strictly a thank you. Nothing else is needed on this page, seeing as the respondents already think you’re amazing.
The second landing page is for everyone else. This page will be a Thank You page, but it will also contain a form field. The goal here is to not only capture the response for the NPS score, but also understand a bit better why the respondent is giving you less than a 5, on the 1-5 scale, or less than a 9 or 10 on a 1-10 scale.
This can be an optional addition, but it could be helpful feedback to gather.
Once we have the Landing Page’s created, let’s create our UTM codes for each of the responses.
Step 2: Create UTM Codes
This step is to take the two links we created with the separate landing pages and create a different UTM code for each potential response. I recommend using all three UTM code parameter’s.
- Campaign
- Medium
- Source
Reason being that with three, you have more flexibility in the future of distinguishing multiple responses.
That being said, here is what your UTM codes should look like:
- Campaign: Customer NPS
- Source: App NPS Survey
- Medium: 5

?utm_campaign=customer-nps&utm_source=app-nps-survey&utm_medium=5As you can see here, the medium is going to be the actual response score. The other parameters are to distinguish the campaign and where the campaign is being deployed.
Remember, you need to create UTM codes for the 5 responses, or the 9 and 10 responses on the first Thank You page we created. Then, all the other UTM codes will be created for the second landing page.
That is how you create your links and distinguish what responses users give. Now, we need to setup the campaign delivery mechanism.
Step 3: Setup Campaign Delivery
There are many ways you can set up the delivery of your NPS survey. Since we are asking customers, I suggest you set it up via communication within your application, or display it only to customers on your website. If you would like to use email, you can use that medium as well.
To setup the delivery, you need to determine your question. Which, can be something like:
How would you rate your experience with us?
Then, you need to determine how you would like to structure your responses. You can simply use a number system, like:
- 1
- 2
- 3
- 4
- 5
Or, you can add a bit of personality and use short statements, like:
- Grand
- Great
- Good
- OK
- Not Good
This is entirely up to you and what fits with your brand.
Once you determine these, insert your links into the text within your preferred delivery method. I would suggest one of the following two deliveries.
If you are using Intercom (or Drift or Snap Engage, but I am not entirely sure about these other two), you can create a proactive chat pop-up with the question and text. The text can have the links embedded, which will allow the user to just click.
If you are using HubSpot, and I mention this as their ability to insert links directly in chat requires a small work around. You can do the same thing as above, you just need to use one of their bots to insert the links. They also have the ability to email a nice NPS survey, but if you would like to deliver it in your application or through a customer segment on your website, you can do that this way.
Other methods could include using AppCues, or Privy, or any number of other pop-up applications. Chat delivery just worked well for me.
Now that you have setup the delivery, it is time to run some backend processes to make your life easier.
Step 4: Setup the Backend Automation
Now it’s time to setup some backed automation to apply all these responses to contacts, date them, and capture any responses users provide in their forms.
A caveat here, is that I am going to describe the automation process from a HubSpot perspective. But, there are other automation programs, like Marketo, Pardot, Drip, or Iterable, which have similar workflow functionality. So, if you use one of those systems, you will just need to translate the HubSpot lingo to your respective systems language.
Setup Contact Properties
The first thing to do is to setup your contact properties. You will need at least 3 new contact properties to track all the necessary information.
The first is a multi-line text property, which is what is used in the form on the poor responses page.
The next is a property for the NPS score itself. I suggest making this a number property for easy export into an excel file. If you use single line text, you will have to convert the excel fields every time.
The last is a date property to date the NPS score response. This will not be used to calculate a score. But, it will allow you to see responses over time. I find dating is a critical step for reporting later.
Once we setup these three properties, you can move onto the next backend item, which is events.
Create Events
The next item is to create an event for each response. The event should be a visit to the dedicated UTM linked page. Or, you can create a simple click event on the link itself. This depends on the system you use to execute.
For simplicity sake, I set up events based on the UTM code link that is visited.
The event is going to be used to trigger the workflows that will capture all the information you need.
Setup your Workflows
Now, you need to setup the workflows. You can setup an individual workflow for each response. Or, you can setup one workflow for all responses and use if/then logic. This is entirely up to you. I use one workflow and place if/then logic based on the response.
What the workflow needs to do is apply the score to the contact in their contact property and then date stamp the response.
Now, you can take this one step further and create two additional workflows that notify people in your organization based on the responses. For example, if the response is low, you can notify the Account Manager or Success Manager to reach out to the customer. Or, you can offer some kind of promotion.
Another example could be if you are looking for Beta Users, you can take the high responses and ask the customer to join a Beta Program.
There are many other options of things you can do. These are just two options to create more items for when a response is sent.
Now that you have the backend automation setup, it is time to go into the launch phase.
Step 5: Launch, Track, Calculate
The last stage is to launch the campaign. Once launched, you will need to wait for responses to trickle in. Then, you can calculate your NPS score, which there is a dedicated section below to do this.
There you have it. You have setup an NPS system. It will allow you to get started with your existing Marketing stack and you can begin to act based on the results.
How to Calculate your NPS Score
You have launched your NPS system and now you need to calculate the score. It’s not difficult.
First, you need to export all your responses. Export the contact email, company (if there is one), the score, and the date. Preferably, export all this to an excel sheet.
Then, we need to group your promoters, passives, and detractors. We defined this at the beginning, but let’s refresh our memory here.
Your Promotors are:
9 or 10 responses on a 1-10 scale, or 5 responses on a 1-5 scale.
Your Passives are:
7 or 8 responses on a 1-10 scale, or 4 responses on a 1-5 scale.
Your Detractors are:
1 to 6 responses on a 1-10 scale, or 1 to 3 responses on a 1-5 scale.
The NPS will be a Promotors less Detractors formula. But, this will be on a percent basis. So, we need to calculate the percentage of Promotors and the percentage of Detractors. Then, simply do the math like below:
You can download our excel template to easily calculate your NPS.
Then, you have your NPS score. It can be from -100 to 100. Hopefully after all this work your score is close to 100.
What do you do Now?
Now that you have your NPS score calculated, it is time to act. If you have a great NPS score, then keep doing what you’re doing. But, if you are surprised by your score, it is time to find ways to make your customers happier.
This can come in the form of product improvements, new products, better customer service, or even more resources. This is where research and the real work begins. The score you just calculated is your baseline. Use this to improve your products and fuel your next stage of growth.
Would you like some help with setting this up? Feel free to reach out.